Aluminizing Fasteners
Bolts, Studs, Nuts & Washers
Scope
Aluminized fasteners is the best solution to corrosion problems on hydroprocessing unit reactors. Stainless steel 347 fasteners, Bolts, Studs Nuts & Washers tend to corrode at high temperatures inside hydrocracker reactors and on related units.
ASTM A193 B8C Class 1 & 2 , ASTM A193 B8CA Class 1, ASTM A194 Grade 8C, ASTM A194 Grade 8CA
Materials
The base material shall be type 347 stainless steel, unless otherwise specified.
Processing

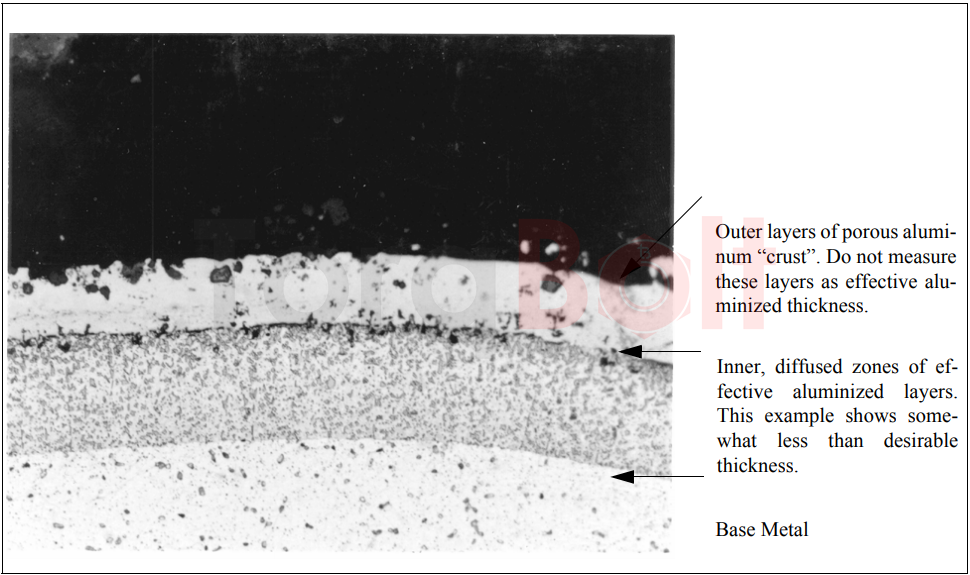
Figure 1: Micrograph at 500X Showing Aluminized Zones
(10% Oxalic Electrolytic Etch, 0.5 amp, 5 seconds)
- The aluminizing process shall produce a non-porous and uniform diffused aluminum surface on the material.
- The material shall have an average depth of diffused aluminum of 0.003 - 0.010 inch, with a depth tolerance of ± 0.001-inch. (That is, no measurement less than 0.002 inch, nor more than 0.011 inch.)
- When measuring diffusion depth, only count the inner diffused zones.
- At the discretion of the vendor, the inside threads of the nuts may be masked off to prevent aluminizing of these threads
Testing

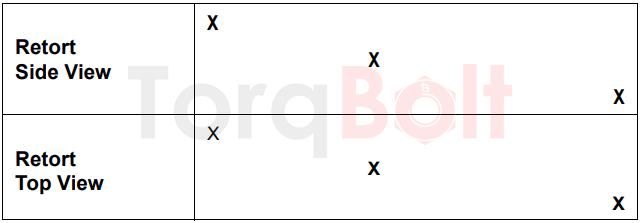
Figure 2: Test Sample Locations
- For orders of fasteners or nuts in which more than 200 pieces are aluminized at once, three samples shall be chosen for destructive examination as follows:
- One sample from the top of the retort vessel at one end.
- One sample from the middle of the retort vessel.
- One sample from the bottom of the retort vessel at the opposite end from the first sample. See Figure 2.
- For orders of fasteners or nuts in which less than 200 pieces are aluminized at once, only one sample need be taken for destructive examination. This sample shall be taken from the middle of the retort vessel.
- After aluminizing, mount, polish and etch cross sections and examine metallographically to determine the depth of the diffused aluminum layers.
- The depth of the diffused aluminum layers shall be in accordance with Processing item 2 and 3.
- Take at least two microphotographs per sample for documentation. See Documentation
- These photographs shall be at magnifications not less than 100X, nor more than 500X.
- Additional photographs may be taken at any magnification.
- When both studs and nuts are aluminized, the nuts shall be assembled onto the studs to ensure that they can be readily put on and taken off after aluminizing.
Documentation
- Two sets of original microphotographs of each of the three metallographically examined samples shall be taken.
- One set of micrographs shall be kept as part of the vendor job file for at least five years, while the other set shall be sent to customer, attention: Reliability Manager of the refinery where the material will be sent.
- Upon the Company's request, portions of the samples used to verify the aluminizing quality
- shall also be sent to the Company.
Shipment And Handling
- The material shall be shipped with the nuts threaded onto the studs.
- A light coat of water-soluble oil may be applied to aluminized surfaces prior to shipment