DIN 906 Specification
Hexagon Socket Pipe Plug
DIN 906 Scope
DIN 906 Specification specifies dimensions, masses and technical delivery conditions for pipe plugs which are intended to be screwed into holes with parallel thread as specified in DIN 158-1, DIN 3858, DIN EN ISO 228-1 and DIN ISO 261.
NOTE 1 Since tightness is a function of pressure, temperature, the materials involved and the fluid with which the threaded parts are in contact, such connections cannot be assumed to be tight. Therefore, depending on the particular application, a sealant or seal ring is provided. This applies in particular where the hole has a thread as specified in DIN ISO 261.
NOTE 2 Specifications for pipe plugs for use in gas and water supply systems are given in DVGW G 600 Technische Regel für Gasinstallationen (Technical rules for gas installations) and the Technische Regeln für Trinkwasserinstallationen (TRWI) (Codes of practice for drinking water installations) as in DIN 1988-200.
NOTE 3 Pipe plugs complying with this standard are not designed to withstand specific tensile loads or pressure loads.
DIN 906 Dimensions
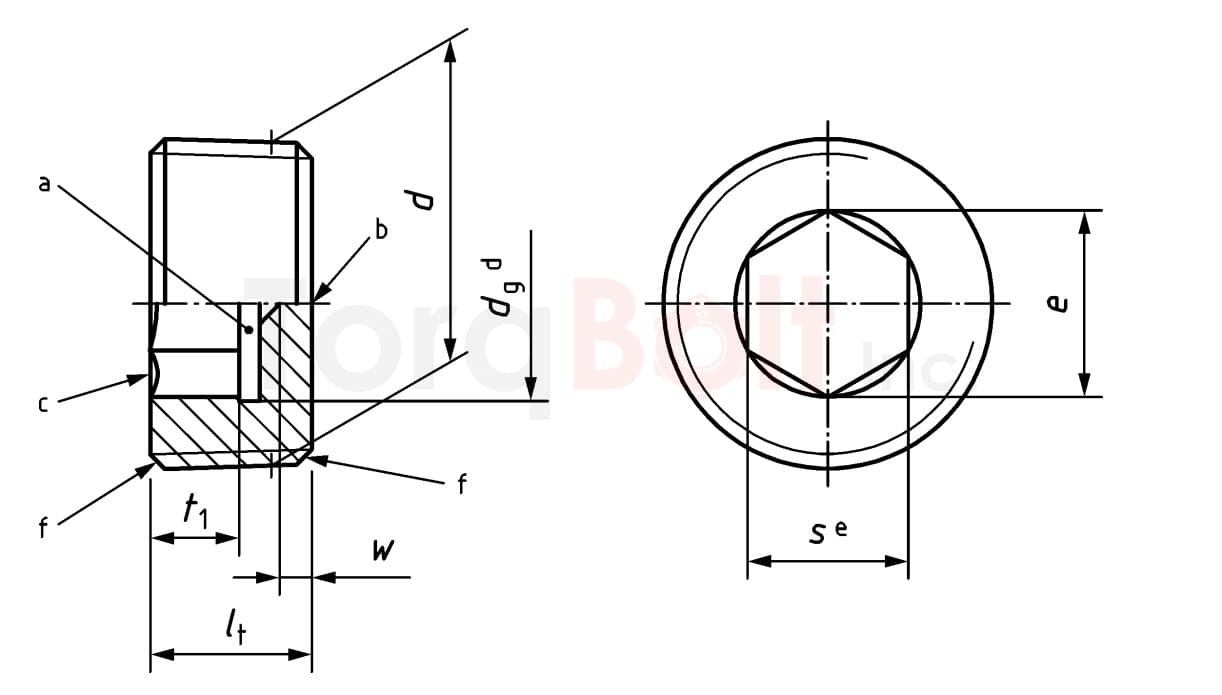
Hexagon Socket Pipe Plug

Hexagon Socket Pipe Plug (ISK)
-
Key :
- dg diameter of thread undercut at the base of the drive
- t1 penetration depth of hexagon socket drive
- a form of socket base at manufacturer's discretion
- b centric elevation of ≤ 0,25 mm for d ≤ 24 mm and ≤ 0,5 mm for d > 24 mm permitted
- c hexagon socket may be slightly rounded or countersunk to 1,2 smax
- d dg ≤ (1,15smax) + 0,5 mm (applies to turned parts only)
- e maximum prebore diameter for turned parts with 1,025 smax
- f any chamfer provided on screw thread for manufacturing reasons shall be not more than 1,5P (P = pitch)
| Thread | It js16 | Hexagon socket | Hexalobular socket as in DIN EN ISO 10664 |
12 point socket as in DIN 34824 |
W min. | Massa (ρ = 7,85 kg/dm3) kg/1000 units ≈ |
||||||||
|---|---|---|---|---|---|---|---|---|---|---|---|---|---|---|
| Metric tapered external thread as in DIN 158-1 |
Whitworth pipe thread as in DIN 3858 |
eb min. | s | t1 min. | No. | t2 min. | Nominal size | t3 min. | ||||||
| (short thread) | Tolerance class 2 (short thread) |
Nominal size | min.c | max.c | ||||||||||
| DIN 906 M6 x 1 keg | - | - | 6 | 3,443 | 3 | 3,020 | 3,080 | 3,0 | - | - | - | - | 1,8 | 0,85 |
| DIN 906 M8 x 1 keg | - | - | 8 | 4,583 | 4 | 4,020 | 4,095 | 4,0 | 25 | 2,0 | N5 | 2,0 | 1,8 | 2,1 |
| DIN 906 M10 x 1 keg | - | DIN 906 R 1/8 | 8 | 5,723 | 5 | 5,020 | 5,140 | 4,0 | 30 | 2,5 | N6 | 2,5 | 1,8 | 3,4 |
| DIN 906 M12 x 1,5 keg | - | - | 10 | 6,863 | 6 | 6,020 | 6,140 | 5,0 | 40 | 2,7 | N8 | 2,9 | 2,0 | 6,10 |
| - | - | DIN 906 R 1/4 | 10 | 8,009 | 7 | 7,025 | 7,175 | 5,0 | 40 | 2,7 | N8 | 2,9 | 2,0 | 7,00 |
| DIN 906 M14 x 1,5 keg | - | - | 10 | 8,009 | 7 | 7,025 | 7,175 | 5,0 | 45 | 2,9 | N8 | 2,9 | 2,0 | 8,10 |
| DIN 906 M16 x 1,5 keg | - | - | 10 | 9,149 | 8 | 8,025 | 8,175 | 5,0 | 50 | 3,7 | N10 | 3,7 | 2,0 | 11,0 |
| - | - | DIN 906 R3/8 | 10 | 9,149 | 8 | 8,025 | 8,175 | 5,0 | 50 | 3,7 | N10 | 3,7 | 2,0 | 12,2 |
| DIN 906 M18 X 1,5 keg | - | - | 10 | 9,149 | 8 | 8,025 | 8,175 | 5,0 | 50 | 3,7 | N10 | 3,7 | 2,0 | 14,6 |
| DIN 906 M20 x 1,5 keg | - | - | 10 | 11,429 | 10 | 10,025 | 10,175 | 5,0 | 55 | 4,6 | N12 | 4,6 | 2,0 | 17,6 |
| - | - | DIN 906 R 1/2 | 10 | 11,429 | 10 | 10,025 | 10,175 | 5,0 | 55 | 4,6 | N12 | 4,6 | 2,0 | 19,0 |
| DIN 906 M22 x 1,5 keg | - | - | 10 | 11,429 | 10 | 10,025 | 10,175 | 5,0 | 55 | 5,4 | N14 | 5,4 | 2,0 | 22,0 |
| DIN 906 M24 x 1,5 keg | - | - | 12 | 13,716 | 12 | 12,032 | 12,212 | 6,0 | 60 | 6,4 | N16 | 6,4 | 2,0 | 30,8 |
| DIN 906 M26 X 1,5 keg | - | - | 12 | 13,716 | 12 | 12,032 | 12,212 | 6,0 | 60 | 6,4 | N16 | 6,4 | 2,0 | 38,6 |
| - | DIN 906 M27 x 2 keg | DIN 906 R 3/4 | 12 | 13,716 | 12 | 12,032 | 12,212 | 6,0 | 60 | 6,4 | N16 | 6,4 | 2,0 | 40,2 |
| DIN 906 M30 x 1,5 keg | DIN 906 M30 x 2 keg | - | 12 | 19,437 | 17 | 17,050 | 17,230 | 6,0 | 80 | 7,3 | N18 | 7,3 | 2,0 | 44,0 |
| - | DIN 906 M33 X 2 keg | DIN 906 R | 12 | 19,437 | 17 | 17,050 | 17,230 | 6,0 | 80 | 7,3 | N18 | 7,3 | 2,0 | 57,5 |
| DIN 906 M36 X 1,5 keg | DIN 906 M36 x 2 keg | - | 15 | 21,734 | 19 | 19,065 | 19,275 | 7,5 | - | - | - | - | 3,0 | 85,2 |
| DIN 906 M38 X 1,5 keg | - | - | 15 | 21,734 | 19 | 19,065 | 19,275 | 7,5 | - | - | - | - | 3,0 | 94,4 |
| - | DIN 906 M39 x 2 keg | - | 15 | 21,734 | 19 | 19,065 | 19,275 | 7,5 | - | - | - | - | 3,0 | 103,0 |
| DIN 906 M42 x 1,5 keg | DIN 906 M42 X 2 keg | DIN 906 R11/4 | 18 | 25,154 | 22 | 22,065 | 22,275 | 11,5 | - | - | - | - | 3,0 | 135,0 |
| DIN 906 M45 x 1,5 keg | DIN 906 M45 X 2 keg | - | 18 | 25,154 | 22 | 22,065 | 22,275 | 11,5 | - | - | - | - | 3,0 | 167,0 |
| DIN 906 M48 x 1,5 keg | DIN 906 M48 x 2 keg | DIN 906 R11/2 | 20 | 27,434 | 24 | 24,065 | 24,275 | 11,5 | - | - | - | - | 4,0 | 214,0 |
| DIN 906 M52 X 1,5 keg | DIN 906 M52 X 2 keg | - | 20 | 27,434 | 24 | 24,065 | 24,275 | 11,5 | - | - | - | - | 4,0 | 253,0 |
| - | DIN 906 M56 X 2 keg | - | 22 | 36,571 | 32 | 32,080 | 32,330 | 13,0 | - | - | - | - | 4,0 | 274,0 |
| - | DIN 906 M60 x 2 keg | - | 22 | 36,571 | 32 | 32,080 | 32,330 | 13,0 | - | - | - | - | 4,0 | 350,0 |
|
||||||||||||||
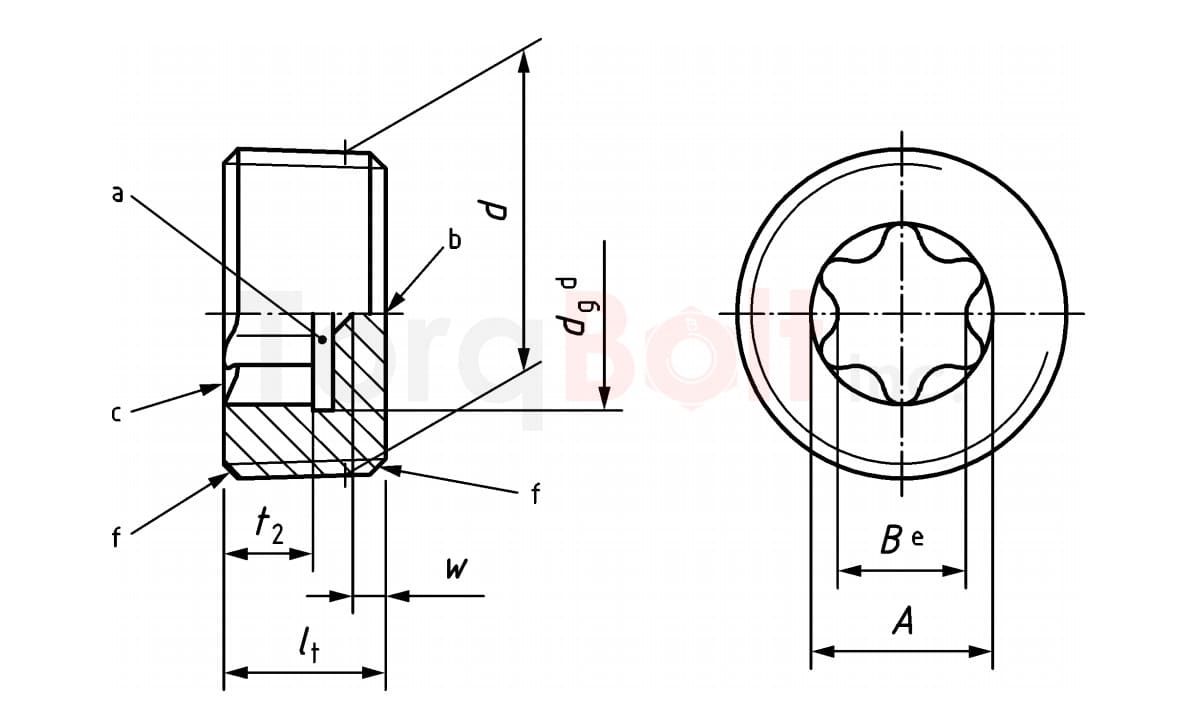
Pipe Plug With Hexalobular Socket

Pipe Plug With Hexalobular Socket (ISR) as in DIN EN ISO 10664
-
Key :
- dg diameter of thread undercut at the base of the drive
- t1 penetration depth of hexalobular socket drive
- a form of socket base at manufacturer's discretion
- b centric elevation of ≤ 0,25 mm for d ≤ 24 mm and ≤ 0,5 mm for d > 24 mm permitted
- c hexalobular socket (ISR) may be slightly rounded or countersunk to 1,1A
- d dg ≤ A + 0,5 mm (applies to turned parts only)
- e maximum prebore diameter for turned parts with 1,15B
- f any chamfer provided on screw thread for manufacturing reasons shall be not more than 1,5P (P = pitch)
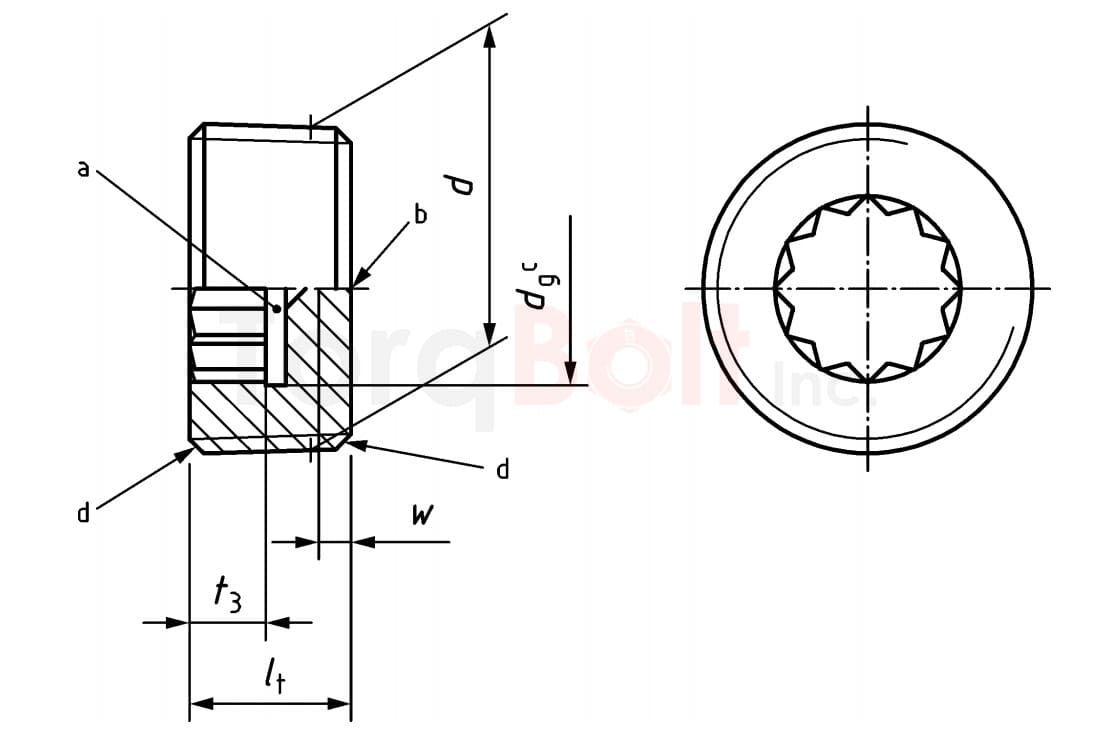
Pipe Plug With 12 Point Socket

Pipe Plug With 12 Point Socket (IVZ) as in DIN 34824
-
Key :
- dg diameter of thread undercut at the base of the drive
- t3 penetration depth of 12 point socket drive
- a form of socket base at manufacturer's discretion
- b centric elevation of ≤ 0,25 mm for d ≤ 24 mm and ≤ 0,5 mm for d > 24 mm permitted
- c dg ≤ d1 max + 0,5 mm (applies to turned parts only); with d1 max as in DIN 34824
- d any chamfer provided on screw thread for manufacturing reasons shall be not more than 1,5P (P = pitch)
DIN 906 Technical delivery conditions
| Material | Steel | Stainless steel | Nonferrous metals | |
|---|---|---|---|---|
| General requirements | DIN ISO 8992 | |||
| Thread | DIN 158-1: short thread/ DIN 3858: tolerance class 2 (short thread) | |||
| Chemical composition | Materialsa | Free-machining steel without lead additives Cold extrusion steel | A1 to A5 | AL1 to AL6 CU1 to CU7 |
| Standards | DIN EN 10277, DIN EN 10263-2 | DIN EN ISO 3506-1 | DIN EN 28839b | |
| Limit deviations, geometrical tolerances | Product grade | B | ||
| Standards | DIN EN ISO 4759-1, DIN 267-2 | |||
| Surface finish - Coating | As processed (without coating) Phosphate coatings as specified in DIN EN ISO 9717 Electroplating as specified in DIN EN ISO 4042 Nonelectrolytically applied zinc flake coatings as specified in DIN EN ISO 10683 |
Clean and metallically bright | As processed (without coating) | |
| Surface discontinuities | DIN EN 26157-3 applies by analogy to limits for surface discontinuities. | |||
| Acceptance inspection | Acceptance inspection as specified in DIN EN ISO 3269 | |||